Showing posts with label jboss. Show all posts

Wednesday, October 14, 2015

Data as a Service: JBoss Data Virtualization and Hadoop powering your Big Data solutions

Guest blog by Syed Rasheed, Senior Product Marketing Manager
Twitter @Junooni, eMail [email protected]


Red Hat and Cloudera, announce the formation of a strategic alliance. From JBoss perspective, the key objective of the alliance is to leverage big data enterprise-wide and not let Hadoop become another data silo. Cloudera combined with Red Hat JBoss Data Virtualization integrates Hadoop with existing information sources including data warehouses, SQL and NoSQL databases, enterprise and cloud applications, and flat and XML files. The solution creates business-friendly, reusable and virtual data models with unified views by combining and transforming data from multiple sources including Hadoop. This creates integrated data available on-demand for external applications through standard SQL and web services interfaces.
The reality at vast majority of organization is that data is spread across too many applications and systems. Most organizations don’t know what they’ve lost because their data is fragmented across the organization. This problem does not go away just because an organization is using big data technology like Hadoop; in fact, they get more complicated. Some organizations try to solve this problem by hard coding the access to data stores. This simple approach inefficiently breaks down silos and brings lock-in with it. Lock-in makes applications less portable, a key metric for future proofing IT. This approach also impedes organizational agility because hard coding data store access is time consuming and makes IT more complex, incurring technical debt. Successful business need to break down the data silos and make data accessible to all the applications and stakeholders (often a requirement for real time contextual services).
redhat-jboss-datavirt
A much better approach to solving this problem is abstraction through data virtualization. It is a powerful tool, well suited for the loose coupling approach prescribed by the Modern Enterprise Model. Data virtualization helps applications retrieve and manipulate data without needing to know technical details about each data store. When implemented, organizational data can be easily accessed using a simple REST API or via familiar SQL interface.
Data Virtualization (or an abstracted Data as a Service) plugs into the Modern Enterprise Platform as a higher-order layer, offering the following advantages:
  • Better business decisions due to organization wide accessibility of all data
  • Higher organizational agility
  • Loosely coupled services making future proofing easier
  • Lower cost
Data virtualization is therefore a critical part of the big data solution. It facilitates and improves the use of big data in the enterprise by:
  • Abstracting big data into relational-like views
  • Integration with existing enterprise sources
  • Adding real time query capabilities to big data
  • Providing full support for standard based interfaces like REST and OData in addition JDBC and ODBC.
  • Adding security and governance to the big data infrastructure
  • Flattening data siloes through a unified data layer.
Want to learn more, download, and get started with JBoss Data Virtualization visit http://www.jboss.org/products/datavirt
Data Virtualization by Example https://github.com/datavirtualizationbyexample
Interested in community version then visit http://teiid.jboss.org/

Be Sociable, Share!

Sunday, June 14, 2015

Summit by day, party by night

Visit the Red Hat booth in Hall D at Red Hat Summit where you can see our awesome line up of demos and pick up a card with the party details which is being brought to you by the Application Platforms Business Group.  We look forward to seeing you there!


Tuesday, June 2, 2015

scientia potentia est with JBoss Data Virtualization

The phrase "scientia potentia est" is a Latin aphorism often meaning "knowledge is power" and is commonly attributed to Sir Francis Bacon.  In a business, the ability to gain power from knowledge comes from fast and accurate access and analysis of data. By integrating and virtualizing data with an open solution, JBoss Data Virtualization, your IT department can simplify data access, improve data quality and compliance, and deliver the information and responsiveness your business needs to make better business decisions.  Watch the video below to see how to effectively optimize and grow your business with Red Hat JBoss Data Virtualization.
Without a data virtualization strategy, you risk knowing less about your customer, delivering fewer real-time business insights, losing competitive advantage, and spending more to address data challenges. - FORRESTER RESEARCH


As described through the video, make your data work for you.  

Maximize return on assets:  Gain critical business insights by making all data easily consumable by people who need it.
  • Improve the use of data assets.
  • Derive more value from existing hardware and storage investments.
  • Complement existing integration technologies like service-oriented architecture (SOA); enterprise application integration (EAI); and extract, transform, and load (ETL).
Boost agility and respond faster to change:   Model-driven graphical design and development environments let you respond faster to change and improve your staff's efficiency. Your data virtualization projects are completed faster, so you realize benefits sooner.
  • Better and faster than hand-coding and physically copying and moving data
  • Faster and less costly than batch data movement
  • Optimized development and maintenance with loose coupling
Increase employee productivity for faster time to value:  JBoss Data Virtualization gives your organization the unified information it needs to increase revenue and reduce costs by:
  • Delivering data in the right form, at the right time, to the right people.
  • Providing decision support and greatly enhancing the value of business intelligence (BI) with a complete view of the information you need.
  • Allowing the mixing of on-premise data with cloud data, and real-time operational data with historical information.
Improve information control and compliance:  Data virtualization layers deliver data firewall functionality. JBoss Data Virtualization improves data quality with:
  • Centralized data authentication, access control, and policy enforcement.
  • Robust security infrastructure and auditing.
  • Reduced risk with fewer physical copies of data.
The metadata repository catalogs enterprise data locations and the relationships between the data in various data stores, creating transparency and visibility.

Learn more about Use Cases through this introduction and the first of the Data Virtualization Primer Series: http://redhat.slides.com/kennethwpeeples/dvprimer-introduction

Wednesday, May 20, 2015

Data Virtualization Primer - The Concepts


Before we move on to Data Virtualization (DV) Architecture and jump into our first demo for the Primer, let's talk about the concepts and examine how and why we want to add a Data Abstraction Layer.

This is the second in our Data Virtualization Primer Basics Series.  I cover the concepts in the presentation below which are also at http://teiid.jboss.org/basics/.  We will also highlight some of the concepts in this article.

We have some main concepts that we should highlight which are:
  • Source Models
  • View Models
  • Translators
  • Resource Adaptors
  • Virtual Databases
  • Modeling and Execution Environments
Source Models represent the structure and characteristics of physical data sources and the source model must be associated with a translator and a resource adaptor.  View Models represent the structure and characteristics you want to expose to your consumers.  These view models are used to define a layer of abstraction above the physical layer.  This enables information to be presented to consumers in business terms rather than as it is physically stored.  The views are defined using transformations between models.  The business views can be in a variety of forms: relational, XML or Web Services.

A Translator provides a abstraction layer between the DV query engine and physical data source, that knows how to convert DV issued query commands into source specific commands and execute them using the Resource Adaptor.   DV provides pre-built translators like Oracle, DB2, MySQL, Postgres, etc.   The resource adaptor provides the connectivity to the physical data source.  This provides the way to natively issue commands and gather results.  A resource adaptor can be a Relational data source, web service, text file, main frame connection, etc.


A Virtual Database (VDB) is a container for components used to integrate data from multiple data sources, so they can be accessed in a integrated manner through a single, uniform API.  The VDB contains the models.  There are 2 different types of VDBs.  The first is a dynamic VDB is defined using a simple XML file.  The second is a VDB through the DV designer in eclipse which is part of the integration stack and this VDB is in Java Archive (JAR) format.  The VDB is deployed to the Data Virtualization server and then the data services can be accessed through JDBC, ODBC, REST, SOAP, OData, etc.


The two main high level components are the Modeling and Execution Environments.  The Modeling Environment is used to define the abstraction layers.  The Execution Environment is used to actualize the abstract structures from the underlying data, and expose them through standard APIs. The DV query engine is a required part of the execution environment, to optimally federate data from multiple disparate sources.

Now that we highlighted the concepts, the last topic to cover is why the data abstraction, the data services, are good for SOA and Microservices.  Below are some of the reasons why the data services are important in these architectures:
  • Expose all data through a single uniform interface
  • Provide a single point of access to all business services in the system
  • Expose data using the same paradigm as business services - as "data services"
  • Expose legacy data sources as data services
  • Provide a uniform means of exposing/accessing metadata
  • Provide a searchable interface to data and metadata
  • Expose data relationships and semantics
  • Provide uniform access controls to information


Stayed tuned for the next Data Virtualization Primer topic!

Series 1 - The Basics
  1. Introduction
  2. The Concepts (SOAs, Data Services, Connectors, Models, VDBs)
  3. Architecture
  4. On Premise Server Installation
  5. JBDS and Integration Stack Installation
  6. WebUI Installation
  7. Teiid Designer - Using simple CSV/XML Datasources (Teiid Project, Perspective, Federation, VDB)
  8. JBoss Management Console
  9. The WebUI
  10. The Dashboard Builder
  11. OData with VDB
  12. JDBC Client
  13. ODBC Client
  14. DV on Openshift
  15. DV on Containers (Docker)

Monday, April 13, 2015

Data Virtualization 6.1 Getting Started Videos


Last Month JBoss Data Virtualization 6.1 was released.  It is a released packed with goodness around three major areas: Big Data, Cloud and Development/Deployment Improvements.  To get you started with an initial JDV video series, Blaine Mincey, Senior Solutions Architect, walks you through a "Soups to Nuts" 3 part series.  Look for more videos soon.  I have also included some new features and links on JDV below.

Getting Started Part 1 - Installing JDV and configuring JBDS with JDV and the Teiid Designer components


Getting Started Part 2 - Creates a Teiid project and creates a relational model from an XML file


Getting Started Part 3 - Project created in Part 2 and deploys that to the JDV server and then accesses the VDB from a Java application using the Teiid JDBC driver


JDV 6.1 Overview

JDV 6.1 GA is available for download from
- JBoss.org at http://www.jboss.org/products/datavirt/overview/
- Customer Portal at https://access.redhat.com/products/red-hat-jboss-data-virtualization

JDV 6.1 Documentation is available at https://access.redhat.com/documentation/en-US/Red_Hat_JBoss_Data_Virtualization/

JDV 6.1 WebUI (Developer Preview) is available for download at: https://www.jboss.org/products/datavirt/download/

For JDV 6.1, we focused on three major areas:

• Big Data
• Cloud
• Development and Deployment Improvements

with the following new features and enhancements

BIG DATA

- Cloudera Impala
In addition to the Apache Hive support released in JDV 6.0, JDV 6.1 also supports Cloudera Impala for fast SQL query access to data stored in Hadoop. Support of Impala is aligned with our growing partnership with Cloudera that was announced in October.

- Apache Solr
New in JDV 6.1 is support for Apache Solr as a data source. With Apache Solr, JDV customers will be able to take advantage of enterprise search capabilities for organized retrieval of structured and unstructured data.

- MongoDB
Support for MongoDB as a NoSQL data source was released in Technical Preview in JDV 6.0 and is fully supported in JDV 6.1. Support of MongoDB brings support for a document-oriented NoSQL database to JDV customers.

- JDG 6.4
JDV 6.0 introduced Red Hat JBoss Data Grid (JDG) as a read datasource. We expand on this support in JDV 6.1, with the ability to perform richer queries as well as writes, on both Embedded caches (JDG Library mode) and Remote caches (over Hot Rod protocol).

- Apache Cassandra (Tech Preview)
Apache Cassandra will be released as a Technical Preview in JDV 6.1. Support of Apache Cassandra brings support for the popular columnar NoSQL database to JDV customers.

CLOUD

- OpenShift Online with new WebUI
We introduced JDV in OpenShift Online as Developer Preview with the JDV 6.0 release and have updated our Developer Preview cartridge for JDV 6.1. Also with JDV 6.1, we are adding a WebUI that focuses on ease of use for web and mobile developers. This lightweight user interface allows users to quickly access a library of existing data services, or create one of their own in a top-down manner. Getting Started instructions can be found here: https://developer.jboss.org/wiki/IntroToTheDataVirtualizationWebInterfaceOnOpenShift

Note that the JDV WebUI is also available for use with JDV on premise as a Developer Preview and can be downloaded from JBoss.org at the link above.

- SFDC Bulk API
With JDV 6.1 we improve support for the Salesforce.com Bulk API with a more RESTful interface and better resource handling. The SFDC Bulk API is optimized for loading very large sets of data.

- Cloud Enablement
With JDV 6.1 we will have full support of JBoss Data Virtualization on Amazon EC2 and Google Compute Engine.

PRODUCTIVITY AND DEPLOYMENT IMPROVEMENTS

- Security audit log dashboard
Consistent centralized security capabilities across multiple heterogeneous data sources is a key value proposition for JDV. In JDV we add a security audit log dashboard that can be viewed in the dashboard builder which is included with JDV. The security audit log works with JDV’s RBAC feature and displays who has been accessing what data and when.

- Custom Translator improvements
JDV offers a large number of supported data sources out of box and also provides the capability for users to build their own custom translators. In JDV 6.1 we are providing features to improve usability including archetype templates that can be used to generate a starting maven project for custom development. When the project is created, it will contain the essential classes and resources to begin adding custom logic.

- Azul Zing JVM
JDV 6.1 will provide support for Azul Zing JVM. Azul Zing is optimized for Linux server deployments and designed for enterprise applications and workloads that require any combination of large memory, high transaction rates, low latency, consistent response times or high sustained throughput.

- MariaDB
JDV 6.1 will support MariaDB as a data source. MariaDB is the default implementation of MySQL in Red Hat Enterprise Linux 7. MariaDB is a community-developed fork of the MySQL database project, and provides a replacement for MySQL. MariaDB preserves API and ABI compatibility with MySQL and adds several new features.

- Apache POI Connector for Excel
JDV has long supported Microsoft Excel as a data source. In JDV 6.1, we add support for the Apache POI connector that allows reading of Microsoft Excel documents on all platforms.

- Performance Improvements
We continue to invest in improved performance with every release of JDV. In JDV 6.1, we focused particularly on improving performance with dependent joins including greater control over full dependent join pushdown to the datasource(s).

- EAP 6.3
JDV 6.1 will be based on EAP 6.3 and take advantage of the new patching capabilities provided by EAP.

- Java 8
With JDV 6.1 we offer support for Java 8 in addition to Java 7 and Java 6.


Monday, March 16, 2015

Data Virtualization Web UI now released for Developer Preview


We are very happy to announce the Data Virtualization 6.1.0 WebUI for Developer Preview. An easy and simple way to create artifacts through a web interface and help be productive with DV in minutes. Once signing onto the WebUI you can create your Data Services and manage your Data Library. Watch for more Articles, Videos and Blogs for using the WebUI. The WebUI is a compliment to the Teiid Designer in the integration stack for Eclipse.

The steps to install the Data Virtualization WebUI are simple and they are listed below. 

Step 1: Download Data Virtualization 6.1.0 GA installer and the WebUI war from jboss.org DV downloads

Step 2: After installing DV 6.1, give the teiidUser the odata and rest roles. The user must have these roles to access the rest and odata endpoints. The roles file is located at:

SERVER_DIR/standalone/configuration/application-roles.properties 

The teiid user will look like this: teiidUser=user,odata,rest 

Step 3: Copy the war to: 

SERVER_DIR/standalone/deployments 

Step 4: Open a browser and access the login page with username admin and password admin at

http://localhost:8080/dv-ui


If you are interested in contributing you can find information at https://github.com/Teiid-Designer/teiid-webui


Wednesday, March 4, 2015

The new JBoss Demo Central Github Organization and Site


I am pleased to announce, along with the other JBoss Technology Evangelist -Eric Schabell, Thomas Qvarnstrom and Christina Lin, our Central Organization for JBoss Demo Repositories is available.  The team has worked hard to pull together existing content and start new content as well.

There are two ways to access jbossdemocentral -
1) The website with an easy to navigate front end to access the source code, videos, articles, etc for each demo - http://jbossdemocentral.comhttp://jbossdemocentral.com/#/
2) The github organization with all the source code repositories for the demos -http://github.com/jbossdemocentralhttps://github.com/jbossdemocentral/

Give the demos a try and follow us on twitter and our blogs!

Tuesday, February 10, 2015

Web Application Security Top 10

OWASP (Open Web Application Security Project) is an organization focused on improving security of software.  Their mission is to make software security visible so that individuals and organizations can make informed decisions about software security risks.  They published a Top Ten document to promote awareness for Web Application Security.   The top ten represents the most critical web application security flaws.  A couple of points on the top 10:
  • They have many international versions of the Top 10 list.  
  • The Top 10 continues to change and evolve.  
  • There are hundreds of issues that can possibly affect Web Application Security so don't stop with mitigating the top 10.  OWASP has several resources that can assist such as the OWASP Developer's Guide, OWASP Cheat Sheet Series, OWASP Testing Guide and the OWASP Code Review Guide.
The OWASP Top 10 is a list of the 10 Most Critical Web Application Security Risks and for each Risk it provides:
  • A description
  • Example vulnerabilities
  • Example attacks
  • Guidance on how to avoid
  • References to OWASP and other related resources
You can see these details of each risk at the OWASP Project site here.  I included the overview list below which is also here..


API Management Part 1 with Fuse on Openshift and 3scale on Amazon Web Services


Introduction


A way organizations deal with the progression towards a more connected and API driven world, is by implementing a lightweight SOA/REST API architecture for application services to simplify the delivery of modern apps and services.

In the following blog series, we're going to show how solutions based on 3scale and Red Hat JBoss Fuse enable organizations to create right interfaces to their internal systems thus enabling them to thrive in the networked, integrated economy.

Among the API Management scenarios that can be addresses by 3cale and Red Hat with JBoss Fuse on OpenShift, we have selected to showcase the following:

• Scenario 1 – Fuse on Openshift with 3scale on Amazon Web Services (AWS)
/2015/02/apimanagement-fuse-3scale-scenario1.html
• Scenario 2 – Fuse on Openshift with APICast (3scale’s cloud hosted API gateway)
/2015/02/apimanagement-fuse-3scale-scenario2.html
• Scenario 3 – Fuse on Openshift and 3scale on Openshift
/2015/02/apimanagement-fuse-3scale-scenario3.html

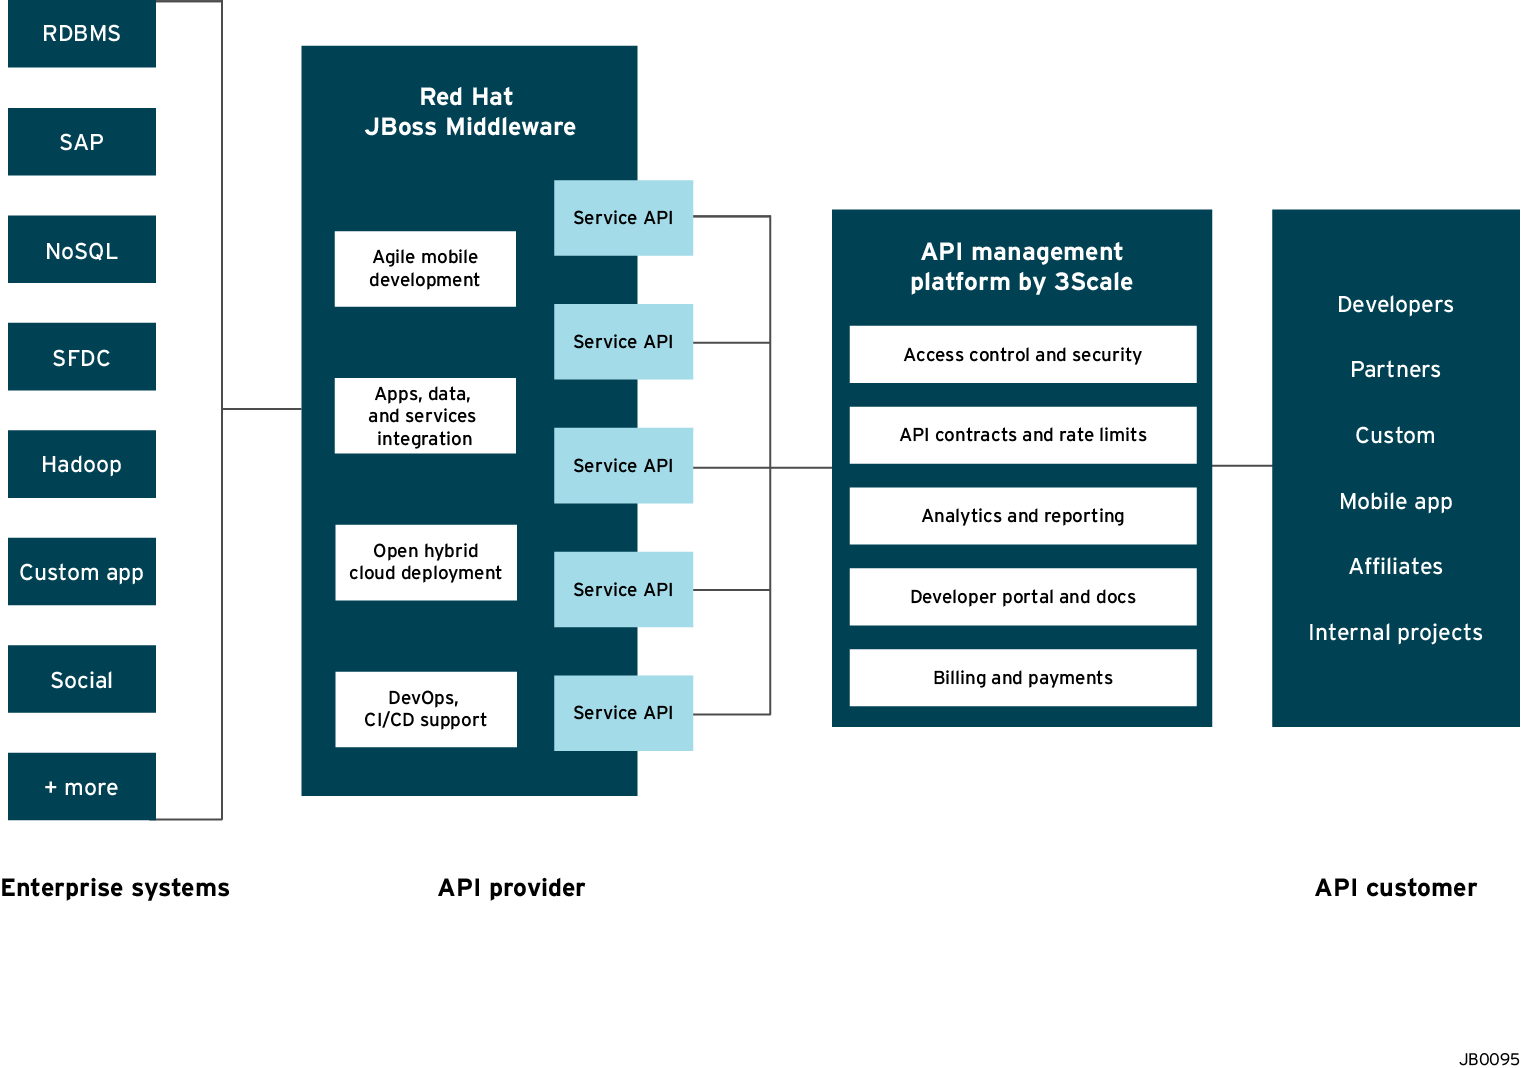
The illustration below depicts an overview of the 3scale API Management solution integrated with JBoss.  Conceptually the API Management sits in between the API backend that provides the data, service or functionality and the API Consumers (developers) on the other side.  The 3scale API Management solution subsumes: specification of access control rules and usage policies (such as rate limits), API Analytics and reporting, documentation of the API on developer portals (including interactive documentation), and monetization including end-to-end billing.
This article covers scenario 1 which is 3scale on AWS and Fuse on Openshift. We split this article into four parts:
  • Part 1: Fuse on Openshift setup to design and implement the API
  • Part 2: 3scale setup for API Management using the nginx open-source API gateway
  • Part 3: AWS setup for API gateway hosting
  • Part 4: Testing the API and API Management 
The diagram below shows what role the various parts play in our configuration.

Part 1: Fuse on Openshift setup


We will create a Fuse Application that contains the API to be managed. We will use the REST Quickstart that is included with Fuse 6.1. This requires a Medium or Large gear to be used as using the small gear will result in out of memory errors and/or horrible performance.

Step 1: Sign onto your Openshift Online Account. You can sign up for a Openshift Online account if you don’t have one.
loginopenshift.png

Step 2: Click the Add Application button after singing on.


Step 3: Under xPaaS select the Fuse type for the application
fuseopenshift.png


Step 4: Now we will configure the application. Enter a Public URL, such as restapitest which gives the full url as appname-domain.rhcloud.com. As in the example below restapitest-ossmentor.rhcloud.com. Change the gear size to medium or large which is required for the Fuse cartridge. Now click on Create Application.


Step 5: Click Create Application

Step 6: Browse to the application hawtio console and sign on

Step 7: After signing on click on the Runtime tab and the container. We will add the REST API example.

Step 8: Click on Add a Profile button
Step 9: Scroll down to examples/quickstarts and click the rest checkbox then add. The REST profile should show on the container associated profile page.


Step 10:  Click on the Runtime/APIs tab to verify the REST API profile.

Step 11: Verify the REST API is working. Browse to customer 123 which will return the ID and name in XML format.

Part 2: 3scale setup


Once we have our API set up on Openshift we can start setting it up on 3scale to provide the management layer for access control and usage monitoring.

Step 1: Log in to your 3scale account. You can sign up for a 3scale account for free at www.3scale.net if you don’t already have one. When you log in to your account for the first time you will see a to-do list to guide you through setting up your API with 3scale.


Step 2: If you click on the first item in the list “Add your API endpoint and hit save & test” you’ll be taken directly to the 3scale Integration page where you can enter the public url for your Fuse Application on Openshift that you have just created, e.g restapitest-ossmentor.rhcloud.com and click on “Update & test.” This will test your set up against the 3scale sandbox proxy. The sandbox proxy allows you to test your 3scale set up before deploying your proxy configuration to AWS.


Step 3: The next step is to set up the API methods that you want to monitor and rate limit. You will do this by creating Application Plans that define which methods are available for each type of user and any usage limits you want to enforce for those users. You can get there from the left hand menu by clicking Application Plans.

and clicking on one of the Application Plans set up by default for your account. In this case we will click on “Basic.”

Which will take you to the following screen where you can start creating your API methods

for each of the calls that users can make on the API:

e.g Get Customer for GET and Update Customers for PUT / etc…


Step 4: Once you have all of the methods that you want to monitor and control set up under the application plan, you will need to map these to actual http methods on endpoints of your API. We do this by going back to the Integration page and expanding the “Mapping Rules” section.


And creating proxy rules for each of the methods we created under the Application Plan.

Once you have done that, your mapping rules will look something like this:


Step 5: Once you have clicked “Update and Test” to save and test your configuration, you are ready to download the set of configuration files that will allow you to configure your API gateway on AWS. As an API gateway we use an high-performance and open-source proxy called nginx. You will find the necessary configuration files for nginx in the same Integration page, by scrolling down to the “Production” section


The final section will now take you through installing these configuration files on your Nginx instance on Amazon Web Services (AWS) for hosting.

Part 3: Amazon Web Services (AWS) Setup


We assume that you have already completed these steps:
  • You have your Amazon Cloud account. 
  • You have created your application and are ready to deploy it to Amazon Cloud. 
  • You have created your proxy on 3scale. 
With that accomplished we are ready to setup our Amazon Cloud Server and deploy our application.

STEP 1. Open Your EC2 Management Console

Screen Shot 2014-12-29 at 1.10.25 PM.png

In the left hand side bar you will see “AWS Marketplace”. Select this, type 3scale into the Search and you will see the 3scale Proxy AMI (Amazon Machine Image) show up in the results. The 3scale Proxy AMI implicitly uses and runs an nginx gateway.

Screen Shot 2014-12-29 at 1.17.07 PM.png

Click “Select”

Screen Shot 2014-12-29 at 5.04.48 PM.png


Click “Continue”

Screen Shot 2014-12-29 at 5.06.24 PM.png


Select plan that is most appropriate to your application and then you can either select “Review and Launch” if you want a simple launch with 3scale or “Next: Configure Instance Details” to add additional detail configuration; such as shutdown, storage and security.

Screen Shot 2014-12-29 at 5.47.00 PM.png


And click “Launch”. The next screen will ask you to create or select an existing public private key.

Screen Shot 2014-12-29 at 5.57.48 PM.png
If you already have a public-private key you created on AWS can choose to use it.

If you do not already have a public-private key pair you should choose to create a new pair.

Screen Shot 2014-12-30 at 6.44.04 PM.png

Your 3scale proxy is now running on AWS.  But now we need to update the 3scale AWS instance with the NGINX config.  From 3scale download the nginx config file and upload it to AWS. Once uploaded and placed in the correct directory then restart your proxy instance.  Upload instructions are found at http://www.amazon.com/gp/help/customer/display.html?nodeId=201376650  The instructions below help you manage your proxy.

  1. head over to the your AWS Management Console and go into the running instances list on the EC2 section.
  2. check that your instance is ready to be accessed. That is indicated by a green check mark icon in the column named Status Checks.
  3. click on over the instance the list to find its public DNS and copy it
  4. log in through SSH using the ubuntu user and the private key you chose before. The command will look more or less like:
  5. ssh -i privateKey.pem [email protected]
  6. once you log in, read the instructions that will be printed to the screen: all the necessary commands to manage your proxy are described there. In case you want to read them later, these instructions are located in a file named 3SCALE_README in the home directory.
Note: Remember that the 3Scale instance runs on Ubuntu on Amazon.  Hence the ubuntu login.

In the next section, we will show how your API and API Management can be tested.

Part 4: Testing the API and API Management


Use your favorite REST client and run the following commands

1. Retrieve the customer instance with id 123

http://54.149.46.234/cxf/crm/customerservice/customers/123?user_key=b9871b41027002e68ca061faeb2f972b
2. Create a customer

http://54.149.46.234/cxf/crm/customerservice/customers?user_key=b9871b41027002e68ca061faeb2f972b

3. Update the customer instance with id 123

http://54.149.46.234/cxf/crm/customerservice/customers?user_key=b9871b41027002e68ca061faeb2f972b

4. Delete the customer instance with id 123

http://54.149.46.234/cxf/crm/customerservice/customers/123?user_key=b9871b41027002e68ca061faeb2f972b

5. Check the analytics of the API Management of your API

If you now log back in to your 3scale account and go to Monitoring > Usage you can see the various hits of the API endpoints represented as graphs.
Usage_-_Index___3scale_API_Management.png
This is just one element of API Management that brings you full visibility and control over your API. Other features are:
  1. Access control 
  2. Usage policies and rate limits 
  3. Reporting 
  4. API documentation and developer portals 
  5. Monetization and billing 
For more details about the specific API Management features and their benefits, please refer to the 3scale product description.

For more details about the specific Red Hat JBoss Fuse Product features and their benefits, please refer to the Fuse Product description.

For more details about running Red Hat JBoss Fuse on OpenShift, please refer to the xPaaS with Fuse on Openshift description.

API Management Part 3 with Fuse on Openshift and 3scale on Openshift

Introduction


A way organizations deal with the progression towards a more connected and API driven world, is by implementing a lightweight SOA/REST API architecture for application services to simplify the delivery of modern apps and services.

In the following blog series, we're going to show how solutions based on 3scale and Red Hat JBoss Fuse enable organizations to create right interfaces to their internal systems thus enabling them to thrive in the networked, integrated economy.

Among the API Management scenarios that can be addresses by 3cale and Red Hat with JBoss Fuse on OpenShift, we have selected to showcase the following:

• Scenario 1 – Fuse on Openshift with 3scale on Amazon Web Services (AWS)
/2015/02/apimanagement-fuse-3scale-scenario1.html
• Scenario 2 – Fuse on Openshift with APICast (3scale’s cloud hosted API gateway)
/2015/02/apimanagement-fuse-3scale-scenario2.html
• Scenario 3 – Fuse on Openshift and 3scale on Openshift
/2015/02/apimanagement-fuse-3scale-scenario3.html

The illustration below depicts an overview of the 3scale API Management solution integrated with JBoss. Conceptually the API Management sits in between the API backend that provides the data, service or functionality and the API Consumers (developers) on the other side. The 3scale API Management solution subsumes: specification of access control rules and usage policies (such as rate limits), API Analytics and reporting, documentation of the API on developer portals (including interactive documentation), and monetization including end-to-end billing.
This article covers scenario 1 which is 3scale on AWS and Fuse on Openshift. We split this article into four parts:
  • Part 1: Fuse on Openshift setup to design and implement the API
  • Part 2: 3scale setup for API Management using the nginx open-source API gateway
  • Part 3: Openshift setup for API gateway hosting
  • Part 4: Testing the API and API Management NOTE: If you followed Article 1 and/or 2 for this series then Part 1 and Part 2 should already be done for you and you can start at Part 3.

Part 1: Fuse on Openshift setup

We will create a Fuse Application that contains the API to be managed. We will use the REST Quickstart that is included with Fuse 6.1. This requires a Medium or Large gear to be used as using the small gear will result in out of memory errors and/or horrible performance.

Step 1: Sign onto your Openshift Online Account. You can sign up for a Openshift Online account if you don’t have one.
loginopenshift.png

Step 2: Click the Add Application button after singing on.

Step 3: Under xPaaS select the Fuse type for the application
fuseopenshift.png

Step 4: Now we will configure the application. Enter a Public URL, such as restapitest which gives the full url as appname-domain.rhcloud.com. As in the example below restapitest-ossmentor.rhcloud.com. Change the gear size to medium or large which is required for the Fuse cartridge. Now click on Create Application.

Step 5: Click Create Application

Step 6: Browse to the application hawtio console and sign on

Step 7: After signing on click on the Runtime tab and the container. We will add the REST API example.

Step 8:  Click on Add a Profile button
Step 9:  Scroll down to examples/quickstarts and click the rest checkbox then add. The REST profile should show on the container associated profile page.

Step 10: Click on the Runtime/APIs tab to verify the REST API profile.


Step 11:  Verify the REST API is working. Browse to customer 123 which will return the ID and name in XML format.

Part 2: 3scale setup

Once we have our API set up on Openshift we can start setting it up on 3scale to provide the management layer for access control and usage monitoring.

Step 1: Log in to your 3scale account. You can sign up for a 3scale account for free at www.3scale.net if you don’t already have one. When you log in to your account for the first time you will see a to-do list to guide you through setting up your API with 3scale.

Step 2: If you click on the first item in the list “Add your API endpoint and hit save & test” you’ll be taken directly to the 3scale Integration page where you can enter the public url for your Fuse Application on Openshift that you have just created, e.g restapitest-ossmentor.rhcloud.com and click on “Update & test.” This will test your set up against the 3scale sandbox proxy. The sandbox proxy allows you to test your 3scale set up before deploying your proxy configuration to AWS.  

Step 3: The next step is to set up the API methods that you want to monitor and rate limit. You will do this by creating Application Plans that define which methods are available for each type of user and any usage limits you want to enforce for those users. You can get there from the left hand menu by clicking Application Plans.
and clicking on one of the Application Plans set up by default for your account. In this case we will click on “Basic.”
Which will take you to the following screen where you can start creating your API methods
for each of the calls that users can make on the API:
e.g Get Customer for GET and Update Customers for PUT / etc…
Step 4: Once you have all of the methods that you want to monitor and control set up under the application plan, you will need to map these to actual http methods on endpoints of your API. We do this by going back to the Integration page and expanding the “Mapping Rules” section.

And creating proxy rules for each of the methods we created under the Application Plan.
Once you have done that, your mapping rules will look something like this:

Step 5: Once you have clicked “Update and Test” to save and test your configuration, you are ready to download the set of configuration files that will allow you to configure your API gateway on AWS. As an API gateway we use an high-performance and open-source proxy called nginx. You will find the necessary configuration files for nginx in the same Integration page, by scrolling down to the “Production” section


The final section will now take you through installing these configuration files on your Nginx instance on OpenShift.
Part 3: NGINIX on OpenShift Instance

We assume that you have already completed these steps:
  • You have your Openshift account.
  • You have created your application and are ready to deploy it to Openshift.
  • You have created your proxy on 3scale.
With that accomplished we are ready to setup our Openshift Application and deploy our configuration.

Step 1: Create an application with the DIY cartridge, either with the client tools (rhc) or through the console.

Step 2: Stop the Openshift Application with so you do not get port binding errors, ie. rhc app stop diytestnginix --namespace ossmentor

Step 3: Use SSH to get t the OpenShift shell, ie ssh [email protected]

Step 4: Setup an the PATH variable for ldconfig or you will get the PATH env when enabling luajit error, ie export PATH=$PATH:/sbin

Step 5: Install the PCRE module
  • cd $OPENSHIFT_TMP_DIR 
  • wget ftp://ftp.csx.cam.ac.uk/pub/software/programming/pcre/pcre-8.36.tar.bz2
  • tar jxf pcre-8.36.tar.bz2 
Step 6: Install and build the nginix-openresty package
  • wget http://openresty.org/download/ngx_openresty-1.7.7.1.tar.gz
  • tar xzvf ngx_openresty-VERSION.tar.gz 
  • cd ngx_openresty-1.7.7.1
  • ./configure --prefix=$OPENSHIFT_DATA_DIR --with-pcre=$OPENSHIFT_TMP_DIR/pcre-8.36 --with-pcre-jit --with-ipv6 --with-http_iconv_module -j2
  • Run gmake
  • Run gmake install 
Step 7: Go to 3scale and download the nginx config proxy_configs.zip which contains the conf and lua files

Step 8: Copy the two files to the openshift application to the $OPENSHIFT_TMP_DIR using scp, ie. scp nginx_2445581129832.lua [email protected]:/tmp/nginix_2445581129832.lua

Step 9: Copy the files to the nginx conf directory, ie cp $OPENSHIFT_TMP_DIR/nginix_244* $OPENSHIFT_DATA_DIR/nginx/conf

Step 10: Rename and Update the nginx.conf file

use the mv command to change the nginx config to nginx.conf
Run env to get OPENSHIFT_DIY_IP and OPENSHIFT_DIY_PORT
Change the Server, IP and port
listen 127.13.112.1:8080;
## CHANGE YOUR SERVER_NAME TO YOUR CUSTOM DOMAIN OR LEAVE IT BLANK IF ONLY HAVE ONE
#server_name diytestnginix-ossmentor.rhcloud.com;
Change the lua file name
## CHANGE THE PATH TO POINT TO THE RIGHT FILE ON YOUR FILESYSTEM IF NEEDED
access_by_lua_file /var/lib/openshift/54c6763fe0b8cd8484000020/app-root/data/nginx/conf/nginix_2445581129832.lua;

Step 11: Start nginx from $OPENSHIFT_DATA_DIR/nginx/sbin

./nginx /var/lib/openshift/54c6763fe0b8cd8484000020/app-root/data/nginx/sbin/nginx -p $OPENSHIFT_DATA_DIR/nginx/ -c $OPENSHIFT_DATA_DIR/nginx/conf/nginx.conf

STEP 12: If you need to stop nginx use ./nginx -s stop

Part 4: Testing the API and API Management


Use your favorite REST client and run the following commands

1. Retrieve the customer instance with id 123

http://54.149.46.234/cxf/crm/customerservice/customers/123?user_key=b9871b41027002e68ca061faeb2f972b
2. Create a customer

http://54.149.46.234/cxf/crm/customerservice/customers?user_key=b9871b41027002e68ca061faeb2f972b
3. Update the customer instance with id 123

http://54.149.46.234/cxf/crm/customerservice/customers?user_key=b9871b41027002e68ca061faeb2f972b
4. Delete the customer instance with id 123

http://54.149.46.234/cxf/crm/customerservice/customers/123?user_key=b9871b41027002e68ca061faeb2f972b

5. Check the analytics of the API Management of your API

If you now log back in to your 3scale account and go to Monitoring > Usage you can see the various hits of the API endpoints represented as graphs.
Usage_-_Index___3scale_API_Management.png
This is just one element of API Management that brings you full visibility and control over your API. Other features are:
  • Access control
  • Usage policies and rate limits
  • Reporting
  • API documentation and developer portals
  • Monetization and billing
For more details about the specific API Management features and their benefits, please refer to the 3scale product description.

For more details about the specific Red Hat JBoss Fuse Product features and their benefits, please refer to the Fuse Product description.

For more details about running Red Hat JBoss Fuse on OpenShift, please refer to the xPaaS with Fuse on Openshift description.